
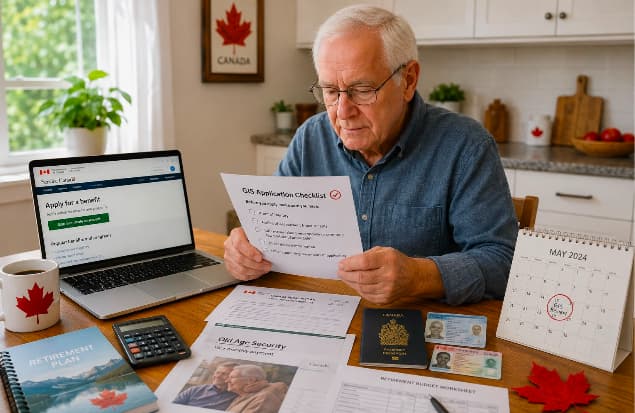
Applying for the Guaranteed Income Supplement (GIS) can feel, kinda overwhelming, especially for seniors who are not sure about who qualifies, what papers you need, or how the whole application process works. If you have a clear GIS Application Checklist, it becomes a lot easier, and people are more likely to prevent those annoying processing delays.
The Guaranteed Income Supplement is a monthly support payment meant to give extra financial help to low-income seniors who already get Old Age Security (OAS). Now, unlike several other government programs, GIS eligibility is mostly tied to income, marital situation, and residency conditions.
Before sending anything in, seniors should gather the right details, double-check whether they meet the requirements, and get comfortable with every step along the way. When the application is prepared properly, benefits are usually processed more smoothly and payments can start sooner rather than later.
This article covers the full GIS Application Checklist. You will find eligibility rules, key documents, the application steps, and the common mistakes that often slow things down.
What Is the Guaranteed Income Supplement (GIS)?
The Guaranteed Income Supplement (GIS) is a monthly, non-taxable benefit from the Government of Canada. It is provided to eligible low-income seniors who receive Old Age Security.
GIS is not the same as OAS because it is primarily based on income levels. Most seniors can qualify for OAS mainly by meeting age and residency requirements, but GIS is more focused on helping seniors who have limited income.
The amount of GIS someone may get generally depends on factors like:
- Annual income, (and sometimes changes in income )
- Marital or common-law status
- Whether a spouse or partner also receives benefits
- Residency history in Canada
Seniors do not have to pay income tax on GIS payments. Still, they need to keep filing their income tax returns every year, since the government uses those tax records to confirm eligibility.
If you want a quick comparison, you can also read our guide on GIS vs OAS: Understanding the Difference Between Benefit
GIS Application Checklist: GIS Eligibility Requirements Checklist
Before applying, seniors should confirm they meet the basic GIS eligibility conditions, basically.
- Age Requirement
To apply, people often need to be 65 years of age or older. In most situations GIS becomes accessible only after someone becomes eligible for Old Age Security. Seniors nearing retirement should go over their benefits early, so they do not miss key application dates, even if it feels far away.
- Receiving Old Age Security (OAS)
Usually, you must be receiving OAS before you can receive GIS.
If you have not applied for OAS yet, finishing your OAS application should come first. You can read more about it in our article on How to Apply for Old Age Security in Canada.
- Income Requirements
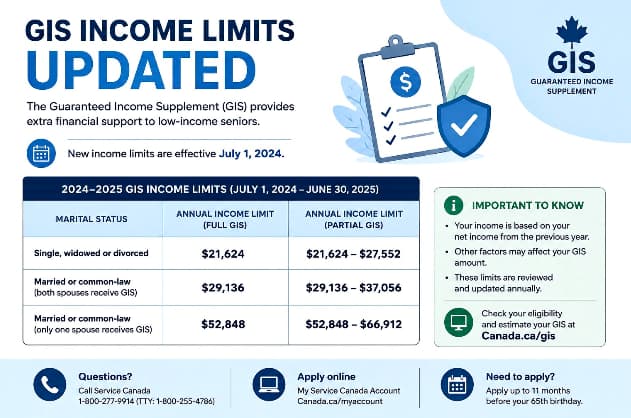
GIS is designed to help seniors with limited income. The government looks at the previous year’s income details to decide whether you qualify.
Income sources that may influence GIS eligibility include:
- Employment income
- Pension payments
- Investment income
- Rental income
- Other taxable income
Some government benefits may not count the exact same way as regular income, so applicants should take a close look at their own case, carefully too.
- Canadian residency requirements
Applicants need to meet Canadian residency rules to qualify.
In general, you must:
- Be a Canadian resident when applying
- Have lived in Canada for the required period after turning 18
People who have lived outside Canada could face different requirements. Seniors who plan to retire abroad should check how their location affects benefits, before applying.
GIS application checklist: required documents
Getting your documents ready before you start can make things move quicker. Use this checklist to be sure you have what is needed.
Social Insurance Number (SIN)
Your Social Insurance Number is required for benefit requests.
Confirm that:
- Your SIN information is accurate
- Your personal details they match government records
- You have your SIN document there, available if it is required
If you need help managing your SIN details, you may also find our resource about How to Replace a Lost or Damaged SIN Card in Canada useful
Personal Identification Documents
Applicants may need identification information, for example:
- Birth certificate
- Canadian citizenship document
- Immigration documents (if applicable)
- Passport information
These documents help to confirm your identity and eligibility status.
Income Information
Because GIS is income-tested,you should have details about your income sources
Get things ready like:
- Pension statements
- Employment income records
- Investment income information
- Other benefit statements
Your tax return information matters too, because Service Canada generally uses the income you reported to assess GIS eligibility.
Marital Status Information
Your marital status or common-law status affects the GIS calculations
You may need:
- Marriage information
- Divorce documents
- Separation details
- Spouse or partner income information
Any change in marital status should be reported because it can alter the amounts of benefits you receive.
You can read more about updating government records by going through our guide, How to Update Marital Status With CRA .
Banking information
If you want your payments deposited straight into your bank account , get ready with the following:
- Bank name
- Account number
- Transit number
Direct deposit is typically the quickest path to receive government benefit payments.
GIS Application Checklist: How to Apply for GIS Benefits
After you finish your GIS Application Checklist, you can start the application part.
Step 1: Confirm Whether You Are Automatically Enrolled
Some seniors might be automatically considered for GIS when they apply for OAS .
Even so, not everyone is enrolled this way, so please make sure your situation is correct before you proceed.
Step 2: Complete the Application
You can apply through the available government service channels, like online services , or paper applications when that is required.
Just confirm every detail is accurate before you submit it.
If any info is incorrect , it can lead to processing delays.
Step 3: Submit Supporting Documents
If documents are asked for, send them as quickly as possible.
Missing paperwork is one of the most common reasons the application ends up taking longer to be processed.
Step 4: Monitor Your Application Status
After you apply , keep an eye on how it is going.
Applicants should frequently check for:
- Requests for extra details
- Approval notices
- Updates about payment
For more guidance, you can read our article about how to check OAS application status.
Common GIS Application Mistakes to Avoid
Even small errors can slow down benefit approval. Here are frequent missteps seniors should avoid.
Not filing taxes every year can mess things up a bit
GIS eligibility really leans on income data from tax records.
If you dont file taxes, it can interrupt how benefits get calculated and may also delay payments.
Providing the wrong income details
Before sending anything in, applicants should double-check every income figure carefully.
If the information is wrong, you might see:
- Delayed processing
- Incorrect benefit amounts
- Future adjustments
Forgetting to report changes
Your GIS payment might change when your situation changes.
Common updates include:
- Marriage or separation
- Income changes
- Moving outside Canada
- Updates to banking details
Applying too late
Many seniors wait until they need financial help before checking eligibility.
Applying early gives you time to gather documents and correct small issues that show up.
Tips for a successful GIS application
A few straightforward actions can make the whole process easier, even if it feels a little tedious.
Keep copies of your documents
Save backups of:
- Application forms
- Supporting documents
- Confirmation notices
- Government correspondence
- Review the information carefully
Before you submit, check:
- Name spelling
- Address details
- SIN information
- Income amounts
- Stay updated
Government benefit rules can change often. Reviewing refreshed information helps seniors grasp their rights and responsibilities
Final thoughts
A complete GIS Application Checklist can make the Guaranteed Income Supplement application process… actually way easier for Canadian seniors. If you prep your eligibility info, pull together the documents they ask for, and avoid some common errors along the way, then you can raise your odds of receiving benefits with fewer, annoying delays.
GIS offers valuable financial support for qualified low-income seniors, but staying organized really matters. Take time to review your personal situation, keep records that are accurate , and make sure your government contact information stays current. That kind of attention helps your benefits keep moving smoothly.
For seniors planning retirement, understanding programs like GIS, OAS and other government benefits is an important move toward better financial security.
Pingback: OAS While Living Outside Canada: Rules & Eligibility